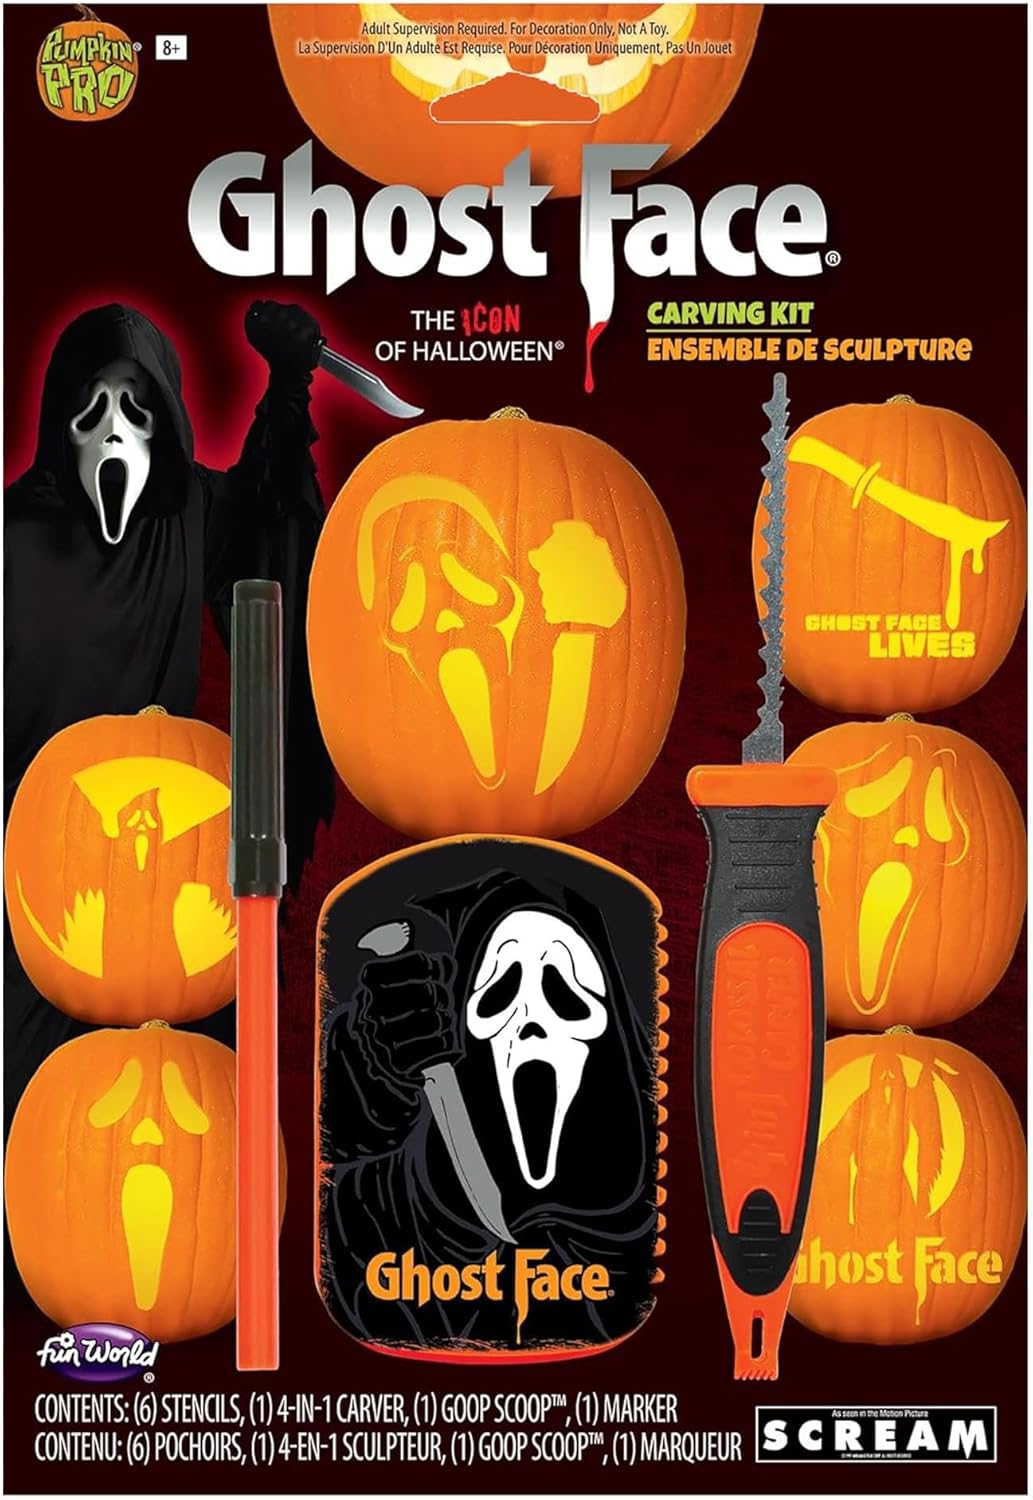
Fun World Officially Licensed Ghost Face Scream Halloween Pumpkin Carving Decorating Kit
FREE Shipping
Fun World Officially Licensed Ghost Face Scream Halloween Pumpkin Carving Decorating Kit
- Brand: Unbranded

Description
You can secure the chosen ghost stencil onto the pumpkin and carve out your design OR you can use the stencil to trace out the design on your pumpkin and carve it that way. A ghost face pumpkin carving template is perfect for creating unique, spooky Halloween decor, from your front porch to the interior of your home. Ghost Face Pumpkin Carving Printables: Once you’ve finished carving your scream pumpkin, it’s time to display it! Here are a few ideas for showing off your creation:
Notice that the lines of the cat face design aren’t simply drilled through the pumpkin, and there are different depths of carvings there, so you should either sharpen your carving knife very well or just use a handheld carving machine such as a Dremel. Dremel is compatible with a huge variety of drilling and carving bits, which makes it a very versatile tool that could fit perfectly into your pumpkin carving scenario, seeing as it can help you create your favorite designs fast and easily. More than that, you probably even wondered if you could do the same with yours, and the answer is yes. How to Get Nice Pumpkin Designs? Using a pencil, draw your design onto the pumpkin. You can freehand your design, or use a template. You can find templates online, or create your own by printing out a design and tracing it onto the pumpkin. Remember, the more complicated the design, the greater the risk for something going wrong – so if you’re not completely confident you know how to carve a pumpkin like a pro, start with something a little more simple, like an easy silhouetted shape, or something without lots of details.We use custom fitted electric lighting. Our LED lights are equivalent to 40 watt bulbs (60-100 watt equivalent are available for larger pumpkins),' explains Chris Soria, co-founder at Maniac Pumpkin Carvers. If you’ve ever been a fan of slasher horror movies, then you must’ve seen Scream, a movie that has become a classic of the genre since its release. We won’t get into detail and blabber about that movie, nor its horrible sequels, but if you didn’t see it and still recognize the mask, you might’ve seen it in the parody, Scary Movie. The Ghostface killer had a mask that almost anyone can recognize nowadays, as it’s become somewhat of an icon for Halloween and horror movies. Although Halloween is a spiritual holiday that symbolizes the end of summer and harvest, it has become a people’s holiday, and it can mean a lot of things, depending on who you’re asking. Well, not teach you as in offer you guidance through the whole process, but at least give you some pointers on what to do next once you’re sitting there holding the chisel or CNC machine (yes, some people use carving machines such as the Dremel Stylo to carve pumpkins) staring at your pumpkin. However, that doesn’t mean you can just drill three identical holes and say, “Look, it’s all surprised now!” because that’s not how it works. If you do that, you’ll basically have a pumpkin-shaped bowling ball, and we don’t want that now, do we? Instead of drilling round holes for the eyes, try making them look like upright eggs, and for the mouth, try making it look sort of like a comma (the symbol) but upside down. You can also add a tiny little nose between the lower sections of the eyes, and if you’re confused, try using our photo as an example. 16. Pumpkin Design – Drilled Vases
Cats, cats, cats, everybody loves them, and Halloween is incidentally a great opportunity to show your affection for these little (sometimes evil) bundles of joy. Although it’s not the first example of carving a cat into your pumpkin (and trust us, it’s not the last, either), it’s different. This creeping cat design looks like it’s been pulled from a Tim Burton movie, as it’s incredibly frail, with thin members, and some over-exaggerated features, but we absolutely love it! Not convinced you can crank out one of these grand gourds? Pro carver Jason Green of Karvd.comdidn’t think he could do it either. “When I was halfway through my first carving, I almost scrapped the whole thing,” he said. “The thing about these carvings is that until they’re lit up, they can look just plain strange.” But, with a steady hand, the right tools, and a bit of patience, you could easily create show-stoppers like the ones shown here. Maybe your kids were a big fan of the Disney idea, but the princesses aren’t their favorite part? Here’s a design for the fairy lovers in the group! Instructables shows you how to cut out a big piece in the shape of Tinkerbell, followed by tiny circles in different sizes to make it look like she’s just flown in, leaving a trail of fairy dust. 20. Cool Pumpkin Carving – Skull in a PumpkinYou take a pumpkin, and you carve it just as you normally should; you give it a mouth, a couple of eyes (or more, or less, it’s really your call), a nose, and everything. After you finish carving, just take a medical mask and place it over the mouth and nose of your pumpkin. You can either use a double-hook clip or a paper clip to attach the mask to the pumpkin, or you can simply tie the elastic bands behind it, granted you don’t have to pull too hard and risk breaking the mask. Stay responsible! 15. Surprised Face – Cute Halloween Pumpkin Idea
As the curtain falls on my ghostly narrative, I hope you found my ghost face pumpkin carving templates useful! Engaging in the time-honored tradition of pumpkin carving doesn't have to be an overly daunting task, nor does it require break-the-bank resources. My spook-tacular templates caters to pumpkins of all shapes and sizes, ensuring a memorable Halloween for all, from toddlers to adults!! If you really want to know how to carve a pumpkin like a pro, instead of cutting through, instead try the ‘scraping’ method we mentioned before – carve away the dark bits of the design, so you’re not cutting all the way through the pumpkin, but instead carving through the wall of the pumpkin’s skin to a depth of about half a centimetre. It’s sometimes easier to go from the centre of the areas you’re cutting out towards your scored lines, as this helps you keep the details intact. You can also use a potato peeler to help you scrape away some of the larger areas.
If there's one pumpkin carving idea that screams "Bite me" – it's this. Using a little and large combo of pumpkins, it's a duo that's destined for success. To create a cool contrast, why not use multiple varieties. For example, your standard orange squash could be gorging on a mini ghost gourd. Top pumpkin carving tips If you’re ready to start, here are 30 of the most creative pumpkin carving designs for you to try this Halloween. 1. Ghostface – Pumpkin Design Using a small, serrated knife or pumpkin carving tool, carefully carve along the lines of your design. Take your time and be careful not to cut yourself. Incidentally, that’s what we recommend you do, as well, if you want to keep things simple and still yield a more-than-satisfying result after your carving attempt. The first few times, you’ll probably end up getting bored and freehanding the whole thing, which, again, isn’t wrong, but you’re here for a specific reason, right? You want to learn how to turn your plain pumpkins into true works of art, so that’s precisely what we’re going to teach you. Choose Your Favorite Stencil: Look through our assortment of spooky ghost faces and choose the one you want to carve.
Wrapping the pumpkin tightly with plastic wrap and keeping it cool when not on display will greatly increase the pumpkins life. You can also lightly spray your pumpkin with diluted lemon juice or vinegar to help prevent oxidation.' How are carved pumpkins lit? thortful pumpkin carving tips : If you’re going to carve out your pumpkin by scraping off the skin instead of cutting through, make sure you cut out your pumpkin lid on the top – otherwise when you put a candle in, there won’t be enough oxygen to burn and it will snuff out.
In fact, most pumpkin carvers still rely on transfer paper and draw the model they’re gonna sculpt on the pumpkin before getting started. You can create your own template by sketching a design on paper. If you are feeling less artistic, you can also print one online. Tape the stencil to the pumpkin then trace the design by poking multiple holes along the lines. When finished remove the paper and rub flour over your design. This will make your lines easier to see so that you can more easily join up the holes ready for carving. Use a spoon or scraper to remove the pumpkin’s insides. Scrape the sides of the pumpkin to make them smooth. Pumpkins can last a few days to three weeks or longer with proper care. They look their absolute best for the first few days after carving and can typically look great for at least a week with minimal care.'
- Fruugo ID: 258392218-563234582
- EAN: 764486781913
-
Sold by: Fruugo